Pay Later
The snappi Pay Later method allows you to repay the cost of your purchase over time instead of all at once. This payment flexibility typically leads to better conversion rates as well as higher cart values.
This API allows you to interact with Baskets and Merchants related to the Buy Now Pay Later functionality.
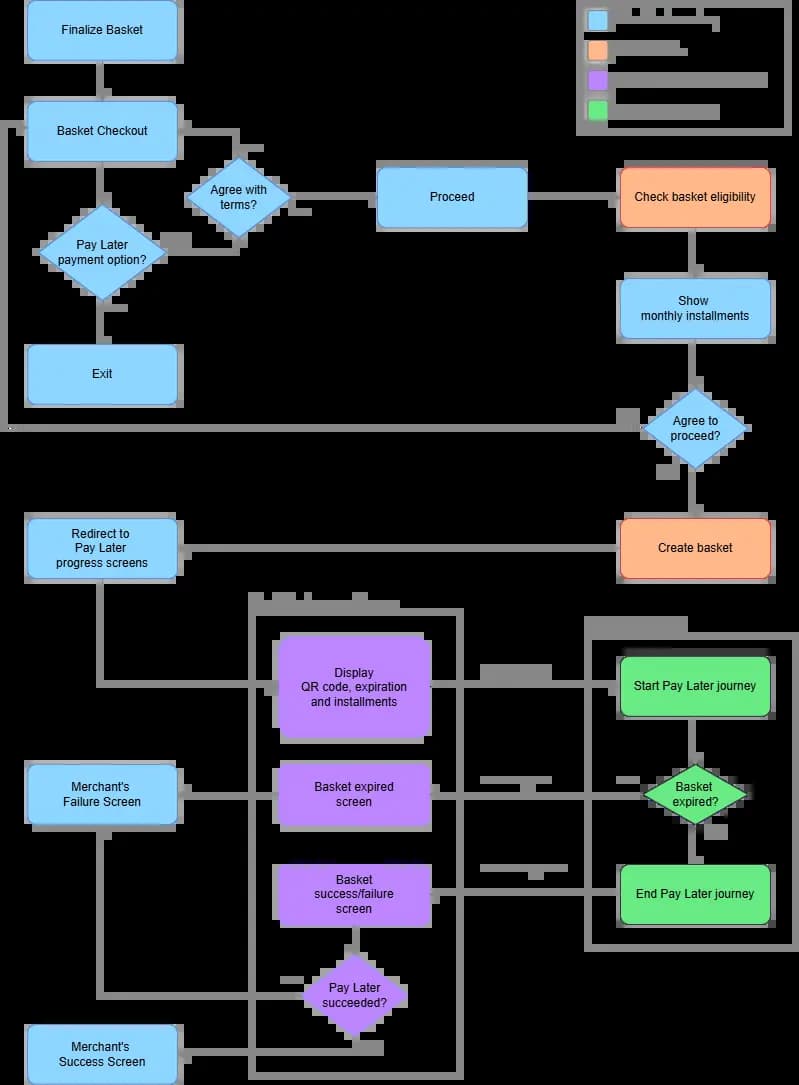
The following diagram illustrates the process by which you can finalize a purchase and choose to pay later in installments.

Here is a step-by-step explanation of each component and action within the flow:
Finalize Basket.
Complete your shopping and finalize your basket. Prepare to check out.
Basket Checkout.
Proceed to the checkout phase, review your basket content and proceed to payment options.
Select Pay Later Payment Option.
At this stage, select the Pay Later payment option from the available payment methods.
Agree with Terms.
A decision point where you must agree to the terms and conditions associated with the Pay Later option.
If you agree:
- Proceed to the next step.
If you disagree:
- The process terminates, and you is redirected back to the basket checkout or another suitable screen.
Check Basket Eligibility.
The system checks if the basket qualifies for the Pay Later option. This involves evaluating the basket contents against predefined criteria such as total amount, product types, and your creditworthiness.
Show Monthly Installments.
If the basket is eligible, the system displays the monthly installment options to you.
Agree to Proceed.
Another decision point where you must confirm their agreement to proceed with the displayed installment plan.
If you agree:
- Proceed to create the basket.
If you disagree:
- The process terminates, and you are redirected back to the basket checkout or another suitable screen.
Create Basket.
The system creates a basket that includes all the items you intend to purchase under the Pay Later plan.
Start Pay Later Journey.
Your journey to complete the Pay Later process begins. This phase involves multiple steps to finalize the Pay Later agreement.
Redirect to Pay Later Progress Screens.
You are redirected to a series of progress screens that provide real-time updates on the Pay Later process. This phase is crucial for maintaining customer engagement and providing transparency throughout the transaction.
- Display QR Code, Expiration, and Installments: The system displays a QR code for the transaction, along with details about the installment plan and the expiration date of the offer. The QR code is displayed in order for you to scan it and start the Pay Later journey in your mobile app.
- Basket Expired Screen: If it takes too long to complete the process, the basket expires, and this screen informs you of the expiration and provides options to restart or return to the basket.
- Basket Success/Failure Screen: Upon completion of the transaction process, this screen provides feedback on whether the Pay Later transaction was successful or failed.
Pay Later Succeeded?
A final decision point where the system checks if the Pay Later transaction was successful.
If the transaction succeeded:
- Redirect to the Merchant’s Success Screen.
If the transaction failed:
- Redirect to the Merchant’s Failure Screen.
Merchant’s Success Screen.
If the transaction is successful, you are redirected to a success screen provided by the merchant. This screen typically includes a confirmation message and details of the purchase.
Merchant’s Failure Screen.
If the transaction fails, you are redirected to a failure screen provided by the merchant. This screen typically includes an error message and options for you to try again or select a different payment method.